
Microsoft Office (Word, Excel & Powerpoint)
Using Microsoft Word
Objectives
- Introduction to MS Office 2003
- Creating a Word document
- Saving a document with password protection Using the auto-save option
- Editing and formatting a Word document Using borders and shading Aligning paragraphs Using margins Using headers and footers Mail merging
Introduction to MS Office 2003
- Microsoft Office 2003 is an office automation software suite which consists of different applications that meet the day-to-day information needs of a business.
- The various application in this suite include MS Word –Word processor
- MS Excel-Spreadsheet application
- MS Powerpoint-Presentation tool
- MS Access-Database Management System
What is a Word Processor ?
- A word processor is a software which is used to compose and edit a document. It helps to Save a document for future reference Modify a document anytime
- Format characters in bold, italics and so on Search for a particular word and replace it with another
- Create personalised letters for customers
Starting MS Word
- With a New Document
- Go to Start > Programs > MS Word
- With an Existing Document
- Go to Start > Documents
- Click the document that you require.
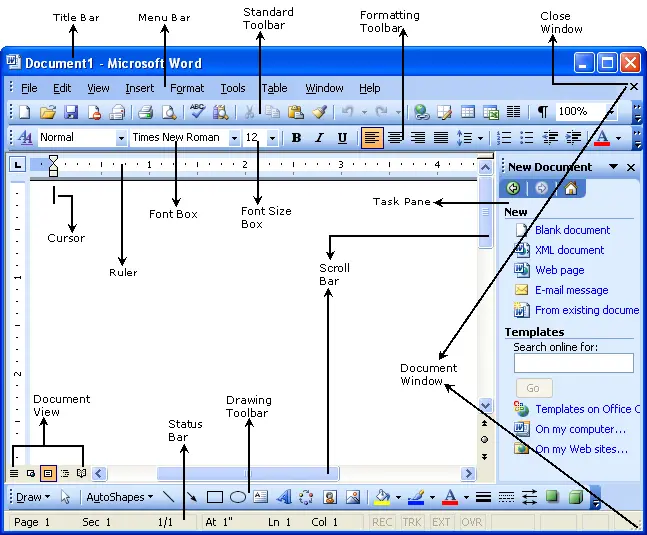
Components of the Main Window
Continued…
- Title Bar
- The Title Bar displays the name of the application along with the name of the document which is currently open.
- Menu Bar
- The Menu Bar displays just below the title bar. On clicking a particular menu item,a submenu with various options displays. These options perform specific actions.
- Standard Toolbar
- Toolbars contain various buttons for specific actions. The toolbar which displays just below the menu bar is called the Standard Toolbar.
- Formatting Toolbar This contains the buttons required to change the appearance of text
- Ruler Bar The bar below the formatting toolbar which displays a scale is called the Ruler Bar.It helps you to adjust the margins in your document.
- Work Area This is the actual area which is used to type documents.
- Scroll Bars There are two types of Scroll Bars in a Word document, Vertical and Horizontal.
- View Buttons There are three types of view buttons Normal view Page Layout view Outline view Status Bar
- The bar which appears at the bottom of the screen and displays the status of the current document in terms of the page number, total number of pages and so on, is called the Status Bar.
Opening a Document
- Click Open on the Standard toolbar
- Or
- Click Open from the File menu
- Select the required Document and click Open.
Creating a New Document
- To create a new Document use any of the following methods:
- Click New on the Standard toolbar
- Or
- Click New from the File menu
Saving the Document
- Save is used to store a document on the hard disk so that it can be retrieved when required.
- Use the following methods to save a Document
- Click Save from the Standard Toolbar.
- or
- Click Save option from the File menu.
Save Options
- Password Protection
- Read Password to prevent other users from viewing the document.
- Write Password allows other users to view the document, but prevents them from modifying it.
- Steps for Password protection
- Click Save.
- Click Tools > General Options
- Provide a Read Password or Write Password in Password to open and Password to modify fields respectively in the window.
Save Options Continued …
- Auto-Save
- Auto-Save is a feature which allows you set time to save your document.
- Steps for Auto Saving
- 1. Click Save.
- 2. Click Tools > General Options
- Set the timing for Auto Recovery in the box Save AutoRecover Info Every .
Editing a Document
- Editing involves
- Text Selection
- Moving and Copying Text
- Deleting Text
- Find and Replace Text
Text Selection
- The text can be selected by using either the mouse or the keyboard.
- Using the mouse, click the first character of the text and drag upto the last character of the text to be selected.
- Using Keyboard, Hold the Shift key at the first character of the text and press the arrow key upto the last character of the text to be selected.
Moving and Copying Text
- To reposition the selected text in a document, Cut and Paste option is used .
- The Copy and Paste option is used to copy the same text to another part of the document.
- Steps
- Select the text to be repositioned.
- Click the Cut to move the text or click the Copy to copy the text.
- Place the cursor at the position where the text has to be copied or moved.
- Click Paste.
- The text is moved or copied to the new position.
Deleting Text
- To remove a particular portion/segment of text from a document
- Select the text to be deleted.
- Press Delete key on the keyboard.
Find and Replace Text
- Find and Replace option is used to find repeated instances of a particular word that needs to be replaced with another word
- Click Find from the Edit menu.
- Type the word to be changed in the Find what field.
- Type the word by which it is to be replaced in the Replace with field.
Formatting Features
It is possible to enhance the appearance of text by applying the various formatting features given below Working with Fonts Changing the Text Case Borders and Shading Working with Paragraphs Bullets and Numbered Text

Working With Fonts
- Select the text .
- Click Font from the Format menu.
Working With Fonts Continued...
- Using the window, the user can choose the following options.
- Font
- Font Style
- Size
- Underline
- Colour
- Strikethrough
- Superscript
- Subscript
- Hidden
- All Caps
Changing the Text Case
- Choose the option Change Case from the Format menu to change the case of the selected text.
- The user can choose the various text cases available in the Change Case window
Borders and Shading
- Applying Borders
- Select Borders and Shading from the Format menu.
- Select the required style, colour and width of the border from the Border and Shading window
Continued…
- Applying Shading
- Shading can be applied to the selected text by choosing the Shading tab from the borders and shading window.
- The shading style and color can be choosen from the shading window.
Working with Paragraphs
- To format a paragraph
- Select Paragraph from the Format menu
- Formatting features such as indentation, line spacing, alignment can be applied.
Bullets and Numbered Text
- Bullets can be applied to any text which is emphasised, point by point.
- To apply bullets
- Select the option Bullets and Numbering from the Format menu.
- Choose the required bullet format.
Continued…
- To apply numbers
- Click the Numbered tab in the Bullets and Numbering window.
- Choose the required Numbering format.
- Outline Numbered
- If a main point has several sub-points, the Outline Numbered format is used.
- Click the Outline Numbered tab in the Bullets and Numbering window.
- Different styles of multi-level numbering can be chosen from the window
Creating Tables
- Tables present comparative data in the form of rows and columns.
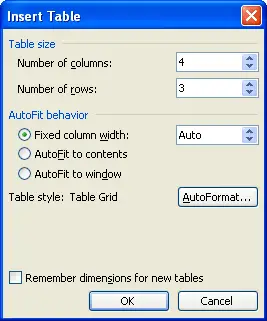
- To Insert a Table
- Select Insert >Table from the Table menu
- Enter the number of columns and number of rows for the table in the given window.
Continued…
- The table is inserted with the specified number of columns and rows.
- Data can be inserted in every cell of the table.
- Use tab key to navigate from one cell to another.
- To increase the no of rows, press tab.
- To increase columns
- To increase the number of columns, position the cursor above the column where a new column has to be inserted.
- Right click the arrow that displays and select Insert Columns from the sub-menu.
Printing Features in Word
- The printing features include
- Setting Margins
- Paper Size
- Inserting Header and Footers
- Page Breaks
- Previewing the document
- Printing the Document
Setting Margins
- Margins are used to align text with the page.
- To set Margins
- Select the option Page Setup from File menu.
- Select the Margins tab.
- Specify the Gutter margins to provide additional space for binding.
- Select Whole Document or This Point Forward from Apply to specify from which page the new margin has to be applied.
Paper Size
- The Word document paper size has to match the paper size of the sheet used in the printer.
- To set paper size
- Select Page Setup option from File menu and click Paper tab.
- Width and Height are displayed automatically. However, they can be altered depending on requirement.
- Select the required orientation as Portrait or Landscape.
- Select Whole Document or This Point Forward from Apply to drop-down list to specify from which page the size has to be applied.
Headers and Footers
- Headers are used when a title is to be repeated on all the pages of a particular chapter in the top margin. Footers are used when page numbers are required at the bottom of pages.
- To apply Headers and Footers
- Select the Header and Footer option from the View menu. A toolbar displays on the screen. Dotted boxes with the title Header at the top of the page and Footer at the bottom of the page displays.
Continued…
- Type the required text in the Header box.
- Insert the page number using the options on the Header and Footer Toolbar.
Page Breaks
- The Page Break option is used when a new page is to be started .
- Select the Break option from Insert menu.
- Select the type of Break from the window as shown and click OK.
Previewing the Document
- To preview the Document
- Select the Print Preview option from File menu.
- OR
- Click the Print Preview button on the Standard Toolbar.
- Various buttons on the Print Preview menu bar display as shown.
Printing the Document
- To print the document
- Select the Print option from File menu or Select the Print button from the Standard Tool Bar to print a document.
- Specify the number of copies to be printed, printer Name, Page Range and no of copies from the window.
Mail Merge
- This feature enables the user to send a common letter to several recipients.
- The process of Mail Merge involves
- Creating the main document.
- Creating the data source
- Merging the data source with the main document
Creating the Main Document
- Open a new document, select Mail Merge from the Tools menu.
- Click Form Letters in the drop-down list from Create tab.
- Select Active Window from the above menu.
- The active document becomes the main document.
Creating the Data Source
- Information is stored in the Data Source in the form of fields and records. A field is a heading which describes the data stored in it. The entire data of a particular person is called a record.
- To create the database
- Select Create Data Source in the drop-down list from Get Data tab of the Mail Merge Window.
- Select the fields which are to be included in the database and click OK.
- Save the Data Source.
- Select Edit Data Source to enter the records of the persons to whom the letters need to be sent in the successive window.
- Enter the details of the persons in the Data Form and click OK.
Connecting the Main document with the Data Source
- After creating the Main Document and Data Source, the Address Book fields have to be positioned correctly in the Main Document.
- To place the fields in the Main Document
- Place the cursor at the position where a field has to be placed.
- Select the required fields from the Insert Merge Field.
Creating the Merged Document
- The last step in Mail Merge is to combine the addresses with the main document to produce individual letters for all addresses in the data source
- Select Merge from the Mail Merge Window
- The merged document can be directly sent to the printer, e-mailed or saved by choosing the options – New Document, Printer or Electronic mail from the Mergeto box from the given window.
- After this click on Merge .
Thank You
Using Microsoft Excel 2003
- Lesson 3
Objectives
- Creating an Excel document
- Saving the document with password protection The auto-save option
- Editing and formatting word documents
- Borders and shading
- Adjusting row and column width
- Working with formulae
- Preparing charts
Introduction to Excel
- Excel is a spreadsheet package.
- The electronic spreadsheet is a collection of rows and columns that enables you to organize data in a readily understandable format.
- Each file in excel is called a workbook and consists of a number of worksheets.
Starting MS Excel
- Excel can be launched by following methods:
- With a New Workbook
- Start -> Programs -> MS Excel.
- With an existing Workbook
- Start -> Documents.
Components of the Main windows Continued…
Formula Bar - The contents of the selected cell is displayed in the Formula Bar. When a computed value is in the selected cell, the calculated result is displayed in the cell and the actual formula used for computation is displayed in the Formula Bar.
Status Bar - The Status Bar displays the status of worksheet (for example, Ready), computed values of a group of cells with numeric data, status of Caps lock, Nums lock and Scroll lock, etc.
Components of Excel windows

Components of Excel windows Continued…
- Active Cell - The currently selected cell where data can be entered or edited is called the Active Cell. The Active cell has a rectangular box indicating that it is active.
- Cell Range - A group of cells is called a Cell Range or simply Range. To select a range, use mouse to click and drag.
- Horizontal Scroll Bar - It is used to scroll the worksheet left and right.
- Vertical Scroll Bar - It is used to scroll the worksheet up and down.
- Sheet Tabs - Each worksheet of a workbook has a tab at the bottom of the Excel window that is labeled with a proper name.
Opening a Workbook
- To open an existing Workbook use any of the following methods:
- Click Open on the Standard toolbar
- Or
- Click Open from the File menu
- Select the required Workbook and click Open.
Creating a New WorkBook
- To create a new WorkBook use any of the following methods:
- Click New on the Standard toolbar
- Or
- Click New from the File menu
Saving the WorkBook
- To save a new WorkBook use any of the following methods:
- Click Save on the Standard toolbar
- Or
- Click Save from the File menu
- If the same file has to be stored with a different name then the option Save As is used.
Editing the WorkBook
- Label: Any text that is entered in a cell is a Label.
- Value :Any number entered in the cell is a Value.
- Formula :Formulas are used to perform specific calculations.
Formatting features of Excel
- A range is a collection of cells.
- A range of cells can consist of a single cell or a column or a part of row or combination of rows and columns or an entire worksheet.
Editing Data
- Moving Data
- Select the range to be moved and use the cut and paste command.
- Copying Data
- Select the range of cells to be copied and click Copy button on standard toolbar.
- Position the cell selector where the data is to copied and click Paste button on standard toolbar.
- Deleting Data
- Select the range and press Delete key on keyboard.
- Restore
- Click the Undo button, to restore deleted data.
Enhancing Data Appearance
- Enhancement in a worksheet can be in the form of changing:
- Font
- Font Type
- Font Style
- Font Size
- Alignment
- Borders
- Height & Width of row and column respectively.
- Currency and Number Formats
Font setting
- The Font dialog box offers not only all standard text-formatting tools like Font type, style and size, but also some special-effect tools.
- To access the Font dialog box :
- Select Cells from Format menu.
- Click on the Font tab.
- Or
- Alternatively, right click the cell where formatting needs to be applied and then
- Select Format Cells option from the menu and click Font tab
- Select the appropriate settings and click on OK.
Alignment
- By default, a label in cell is left-aligned and the value is right aligned.
- To apply alignment :
- Select Cells from Format menu and click Alignment tab.
- Or
- Alternatively, right click the cell where formatting needs to be applied, select Format Cells from the menu and click Alignment tab
- Select the appropriate settings and click OK.
The formatting toolbar for alignment contains Left, Right and Centre buttons, The Left, Right and Centre buttons are used to align text to left, right and center respectively. The Merge and Center Button is used to a centre a title across arrange in the worksheet. To centre a Title: Select the entire range across which the title has to be centered including the cell containing the title text. Click Merge and Center from the Formatting toolbar.
- Continued…
Borders and Shading
- To apply borders to a cell,
- Select the range of cells to which you want to apply a border.
- Click on the down arrow next to the Borders button on Formatting toolbar.
- Select the border style from the border palette
To apply a color to the border, Select the range to which you want to apply a border. Select Cells option from the Format menu and click the Border tab. Select a color from the Color option. Select an option under Border and then select an option under Style. Select appropriate border and click on OK.
- Continued…
Height and width
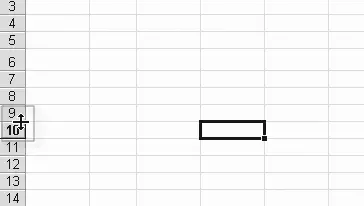
- Adjusting Row Height
- To increase row height :
- Position the mouse pointer on the bottom of the row number to be adjusted.
- The mouse pointer becomes a double-headed arrow as shown in the following figure.
Click and drag the mouse downwards or upwards to increase the height. Alternatively you can double-click at the bottom of the row number. The row height adjusts to fit the tallest entry in the row.
- Continued…
Adjusting Column Width
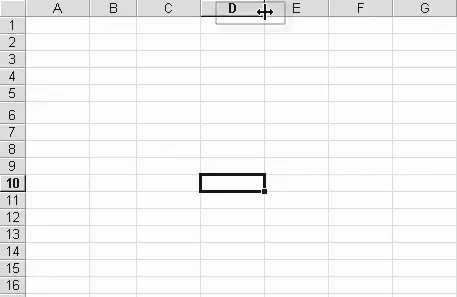
- When a label larger than the cell is entered, it spills over to the adjoining cell. If the adjoining cell is not empty then the characters are hidden or ### is displayed in case of values. Hence, the column width needs to be increased.
- To increase column width:
- Position the mouse pointer over the heading of right column border to be adjusted until it becomes a double headed arrow.
Click and drag the mouse towards right side to increase width.
- Continued…
Alternatively column width can be adjusted using the menu bar. Select Autofit from the row option in Format menu. To reverse the column width to its standard width: Position the cell selector on any cell in the column that has to be adjusted. Select column from the Format menu and click on Standard Width.
- Continued…
Currency and Number Formats
- To apply the comma format for a range,
- Select the range to apply the format or If the format is to be applied select the entire worksheet
- Click Comma on the Formatting toolbar
Continued…
- To apply currency from menu bar,
- Select the range of cells or entire worksheet.
- Select Cells from the Format menu and click Numbers tab.
- Select Currency in the Category list.
Continued..
- To apply Currency style using the Formatting toolbar,
- Select the range of cells or the entire worksheet.
- Click Currency Style on the formatting toolbar.
Auto fill Feature in Excel
- Excel provides you with an Auto fill handle to create a series of sequential numbers or dates.
- To create a series of numbers, months or ordeals:
- Type the name of month or a number in a cell
- Position the mouse pointer on the bottom-right side of the cell selector. The mouse pointer becomes a small + symbol.
- Click and drag the mouse pointer as shown in following figure.
Continued..

Formulae
- To copy formula across adjacent cells,
- Select the cell where the original formula has been entered
- Position the mouse pointer on Auto fill
- Click and drag the mouse pointer over the other cells
- It is important to note that auto fill does not copy values, only the formula.
Continued…
- To copy formula to any non-contiguous cell,
- Select the cell where the original formula has been entered
- Click on Copy in the Format toolbar
- Select the range where the formula has to be copied.
- Click on Paste in the Format toolbar.
Using Functions in Excel
- Excel provides you a set of functions to do commonly used computations. You may use the AutoSum button to use the functions.
- The SUM function is the most frequently used function. This function calculates the total of all the values in the specified range.
- Other commonly used functions are Average, Count, Max and Min.
Charts and Printing
- The data entered in a worksheet can be displayed in charts.
- The changes made in data on worksheets are automatically reflected in the chart.
- Two types of chart can be created in Excel viz. Embedded chart and Chart sheet.
Embedded Chart
- When a chart is displayed on the same worksheet as data, it is an Embedded chart.
- The Embedded chart is automatically linked with the data presented in the worksheet.
- Any changes made in the data are automatically reflected in the chart.
Chart Sheet
- A Chart can also be created on a separate chart sheet .
- It is useful when a magnified view is required.
Creating a Chart
- Chart Wizard provides following steps to prepare a chart.
- Select the Data to be represented as chart.
- Click Chart Wizard in the Standard toolbar or Select Insert > Chart
- Select the type of chart from the Chart Type List box.
- Click Next to open the Chart Source Selection box.
- Select Data range and click Next.
- Select appropriate settings from all the tabs and click Next.
- Select the required option and click Finish to place the chart on the same sheet or on a separate sheet
Modifying a Chart
- After creating a chart the chart can be modified.
- Excel allows you to change the Chart Type, Source Data Range, Chart options, Location and format the chart area.
- To modify the Chart,
- Select the chart and right click to display the menu as shown

Continued..
- Select Format Chart Area to change the border colors/ font or the chart properties.
- The Format Chart Area dialog box contains three tabs Patterns, Font and Properties.
- Select appropriate pattern from pattern tab.
- Select appropriate Font settings.
- Select the appropriate options from each tab and click OK.
Inserting Headers and Footers
- To insert Headers and Footers in Excel do the following steps:
- Select Header and Footer from view menu.
- Enter the text to be displayed as header or footer.
- To customize , click Custom Header or Custom Footer Click OK
Preview and Print
- To preview the worksheet:
- Select Print Preview from the File menu Or Click print preview on the Standard toolbar To print worksheet:
- Select Print from File menu
- Or
- Click print button on standard toolbar
Lesson 3
- Using Microsoft PowerPoint 2003
Objectives
- Using PowerPoint as a presentation package
- Saving the document with password protection Using the Auto save option Designing templates
- Inserting graphs, Clip Arts, pictures, WordArt Customizing animation
Introduction to PowerPoint
- A professional presentation package allows to design a complete presentation within hours, using features such as text handling, outlining and clip art.
- Power-Point also provides designer templates which are used to maintain design and color.
Starting MS PowerPoint
- PowerPoint can be launched by following methods:
- With a New Presentation
- Start -> Programs -> MS PowerPoint.
- With an existing Presentation
- Start -> Documents to view a list of recently used or opened document.
Opening a Presentation
- To open an existing Presentation use any of the following methods:
- Click Open on the Standard toolbar
- Or
- Click Open from the File menu
- Select the required Presentation and click Open.
Creating a New Presentation
- To create a new Presentation use any of the following methods:
- Click New on the Standard toolbar
- Or
- Click New from the File menu
- Select Blank presentation from the New Presentation Dialog box.
Saving the Presentation
- To save a new Presentation use any of the following methods:
- Click Save on the Standard toolbar
- Or
- Click Save from the File menu
- If the same file has to be stored with a different name then the option Save As is used.
Save Options
- While saving a Presentation following options can be specified:
- Auto saving
- Auto save allows you to set time intervals at which your system will automatically save the contents of your presentation.
- Select Options from Tools menu.
- Click on Save Tab.
Editing the Presentation
- Adding slides: New slides can be added to the presentation as and when required.
- Select New Slide from Insert menu.
- Select blank layout and then change the layout by choosing Slide layout from Format menu
- Deleting Slides: Sometimes if a particular slide is not required it can be deleted.
- Select the slide to be deleted from the view pane and press Delete from keyboard.
- OR
- Click on Slide Sorter .
- Select the slide to be deleted and press Delete.
Continued...
- Moving Slides: The order of slides can be changed my moving the slides.
- Adding Notes: PowerPoint allows you to enter the notes through Notes pages view.
- View Presentation: To view the presentation select View Show from Slide Show menu or Slide Show from View menu or click on the slide show view button.
Enhancing slides
- Slides can be made presentable by :
- Applying Background
- Applying Design template
- Applying Slide Layout
- Inserting a word Art
- Inserting Objects
Applying Background
- Select Background from Format menu
- Click the dropdown menu .
- Select Fill Effects from the list to display the Fill Effects screen.
- The Fill Effects window consists of four tabs — Gradient, Texture, Pattern and Picture.
- Select the different colors, patterns, shading style as required, using the tabs.
- A background box screen displayed.
- Select Apply to apply the background to the current slide only or Select Apply to All to apply the background to all the slides of the presentation.
Applying Design template
- Select Apply Design Template from Format menu.
- Select a template from the list and click Apply, to apply a selected template to all slides.
Applying Slide Layout
- To change the layout of the slide:
- Select the slide whose layout needs to changed.
- Select Slide Layout from Format menu.
- Select the layout to be applied from the Slide Layout window.
- Alternatively, right click on the slide and select Slide Design from the menu.
Inserting Objects
- The various objects which can be inserted into the slide are:
- WordArt
- ClipArt
- AutoShape
- Chart
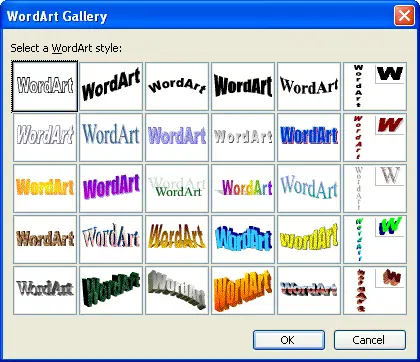
Inserting WordArt
- To insert WordArt
- Select Picture from Insert menu.
- Click on WordArt.
- WordArt Gallery is displayed .
- Select the required format and click OK.
- Select the style/font of the text from the screen.
- Enter the text in the screen.
- Click OK to insert WordArt in the slide.
Inserting a Clip Art
- PowerPoint provides about 200 ClipArt pictures maintained by ClipArt Gallery, which provides the option of previewing a picture before inserting it.
- To insert Clip Art:
- Select Picture from Insert menu.
- Click on ClipArt.
- ClipArt selection window displays.
- Select the ClipArt picture and click Insert clip button.
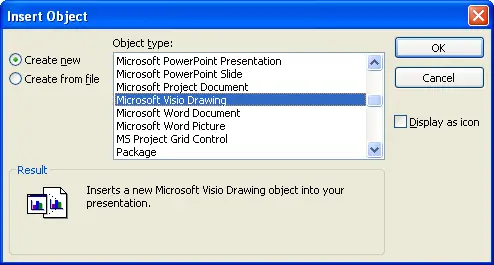
Inserting an Object
- Application objects can be inserted into the slides. The Application objects can be either linked object or embedded object.
- To insert an Object
- Go to Insert > Object.
- To create a new object,
- Select Create new
- Select the application from the list of Object type displayed
- To Create from file, browse and select the source file of the object.
- Click OK.
Position an Object
- To position a object,
- Right click on the object.
- Select Order and click the option of your choice – Bring to Front, Send to Back, Bring Forward Send Backward.
Picture Toolbar
- The Picture toolbar provides tools used to format Pictures To view the Picture toolbar,
- Go to View > Toolbars > Picture
- Select any picture.
- Click on any option in the Picture tool bar. The chosen option will be applied on the selected picture.
Applying animation effects
- PowerPoint provides a feature of applying animation effects to the various objects i.e. text , wordart, clipart, pictures and so on.
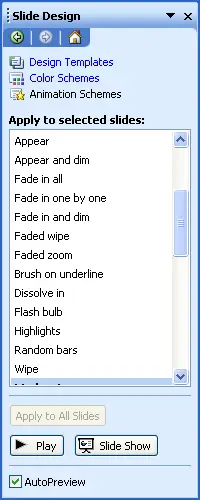
- To apply animation effects:
- Select the slide on which animation effects are to be applied
- Click Slide Show on the menu bar and select Animation Schemes
- A dialogue box is displayed with the option Apply to selected slides.
- Select an animation effect from the list.
Continued…
- A window displays as shown
Custom animation
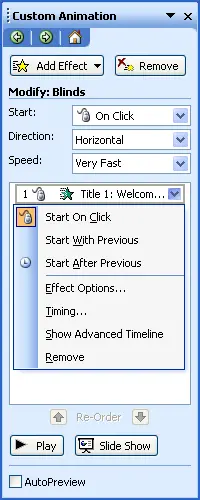
- Custom Animation contains a list of effects that you can apply to objects to have them animate during the slide show.
- To apply custom animation effects:
- Select an element of the slide and click Add Effect to add animation.
- To remove the element from the animation effect, click Remove.
- To Modify effect with Start (this triggers the animation), Property and Speed of the element, click the relevant options.
- Use the drop-down to the right of the item to access the options for a particular effect.
- To change the sequence of the elements appearing in the slide, select the Buttons located on either side of Re-Order.
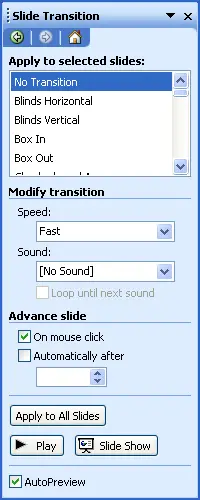
Applying Transition Effects to Slides
- PowerPoint enables you to assign effects to the slide transition.
- To apply slide transition,
- Click Slide Show on the menu bar and select Slide Transition.
- A dialogue box is displayed with the option Apply to selected slides.
- Select a transition effect from the list.
- Select the Speed and Sound.
- To Advance slide, select either On mouse click or Automatically after.
Printing a presentation
- To print a presentation :
- Select Print option from File menu.
- Or
- Click on print icon from Standard toolbar.
- Select the printer.
- Select the Print Range.
- Select slides, handouts, notes page, outline view in Print What field.
- Specify the Number of copies to be printed.
- Click OK.